


 |
| www.thecraftersworkshop.com #TCWstencillove |
As guest designer for The Crafter's Workshop, I've been assigned stencil set number 383 designed by Ronda Palazzari. The purpose of the One Stencil Four Ways series is to demonstrate the endless possibilities of a stencil based on numerous creators.
My first project is a lazy susan redo.

Having this plain Jane Lazy Susan... I really wanted to do something with it and this stencil set gave me the opportunity to change it out. (Insert smirk here... With a couple of lady names in one sentence; maybe I'll name this handy kitchen helper "Susan Jane".)


Then I brushed on a water based paint in onyx color around the edges and wiped off leaving the paint residue in the crevices. This technique allowed me to achieve an aged wood look.

Hmm, not as dark as what I had in mind. Let's do this again, shall we?


The second coat of paint and stain is much better. Then a little wiping and sanding made Suzan Jane a bit older. Maturity is stately, I always say.


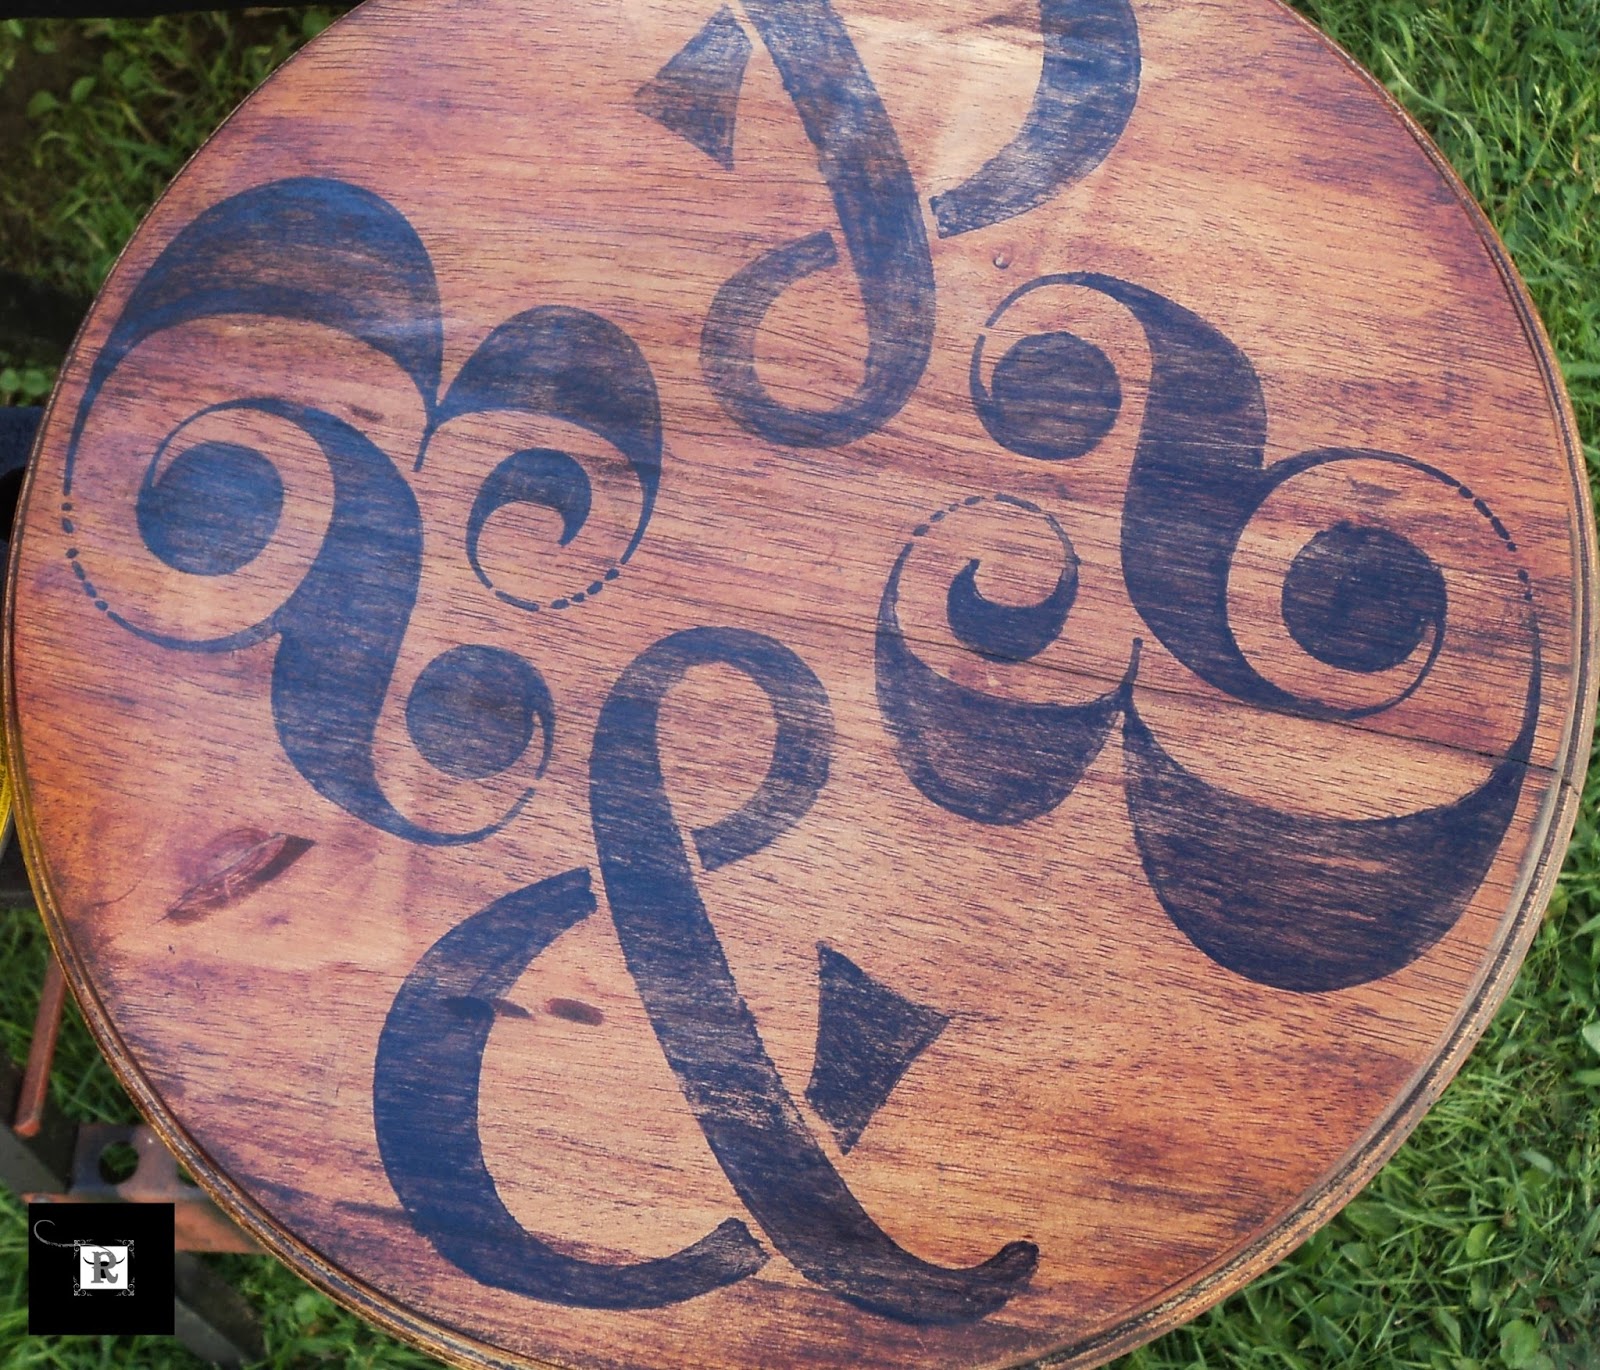

Using coconut oil and a rag, I conditioned the wood to bring out the rich tones by rubbing it in.


I love how you name your creations, but really, they all so beautiful that they deserve a name! Thanks for sharing at Snickerdoodle! :)
ReplyDeleteIn this is lovely! I also have a plain Lazy Susan at home, I should try something similar perhaps :-)
ReplyDeleteTotally cool! Love the plain jane redo into WOW! :) Appreciate the step by step to on how to stencil, this technique should work on anything wood I would think?
ReplyDeleteOh yes! There are so many ways to decorate these. Stains, paints, decoupage, image transfers and more. I hope you share what you do. Thank you Sarka! :)
ReplyDeleteYes, anything! Tables, cabinets, wall hangings, dressers, etc.
ReplyDeleteAnd, the stencils can be used on any surface. I used this set on a lampshade, a fabric collage and a rug so far.
It's funny I come up with names. I think I develop relationships with my subjects when I work on them. LOL!
ReplyDeleteThank you so much, Dee! You are so sweet!
Thank you for the visit and the pin, Taralyn! :)
ReplyDeleteRobin...your "Susan Jane" is not only handy...but she's beautiful...with a bit of whimsy, too! I always love "&" signs and you came up with a fun way of using them. Thanks too for your tutorial and tips!
ReplyDeleteI'm so glad you came by and shared your Great Ideas with us at Project Inspire{d}! Hope you'll be back next week!
[pinning!!]
I'm so thrilled you stopped to check out the post, Diane. Thank you for the invite and for the pinning too! I promise to come back; I've been very busy with so much to share.
ReplyDeleteLove your project!!! THis is the kind of stuff I do in my craft store American Clutter LLC!
ReplyDeleteI am hosting my first ever Tuesday Link Up Party. I hope you can come over and link up with me!! I love meeting new ladies and getting to see all the amazing content everyone has to offer! http://liverandomlysimple.com/totally-terrific-tuesday-linkup-party-1/
Absolutely fantastic!!! I love a good lazy susan...and yours is GREAT! ox Thanks for sharing at Twirl and Take a Bow! ox
ReplyDeletethis looks great!
ReplyDeleteI love this look. It's beautiful. What brand of water base paint did you use? I haven't heard this before. Thanks again and I am popping by from the 365 days craft link party.
ReplyDeleteGreat idea! I am amazed how you come up with those re-dos!
ReplyDeleteI love it! It adds so much character.
ReplyDeleteThanks for linking up to Pin Worthy Wednesday, I have pinned your post to the Pin Worthy Wednesday Pinterest Board- great transformation as always :)
ReplyDeleteThat turned out so good! I need to learn how to do projects like this for my next house. Thanks for sharing with Hump Day Happenings.
ReplyDeleteAw,thanks so much, Robin! :D
ReplyDeleteI'm so glad you stopped.
Thank you!
ReplyDeleteIt's Minwax. This one is Express Color in Onyx. (My favorite. I use it on so many projects and it cleans up with water.)
ReplyDeleteThank you, Zan. It thrills me that you visit! It makes me smile :)
ReplyDeleteHave a wonderful weekend!
I agree, it has an aged appearance. Thank you so much, Melissa!
ReplyDeleteThank you for the pin! I'm so glad to see you here, Amber! :)
ReplyDeleteThis is really easy to do and I bet you can master it without trying, Jenna! I hope you try it and have tons of fun!
ReplyDeleteHave a great weekend!
Thanks for pinning this to the Outside The Box party! What a transformation! I'm pinning it now on our group Pinterest board! Hope to see you again next week!!
ReplyDeleteThanks so much for the pin! :)
ReplyDeleteI'll be back~ Have a great weekend, Brandy!
This turned out great! Thank you for sharing with us at the Merry Monday link Party!
ReplyDeleteThanks, Amanda!
ReplyDeleteI absolutely love this! Looks so cool. Pinned. It is so fun to party with you. Thank you. I hope to see you at our party on Monday at 7 pm. http://loulougirls.blogspot.com/
ReplyDeleteHappy Saturday! Lou Lou Girls
Thanks, Kim! I'll certainly be back :)
ReplyDeleteWhat a cute project and so customizable! Thank you so much for sharing on Meandering Mondays! Have a great week!
ReplyDeleteHi Robin,
ReplyDeleteThis looks amazing. I love it. Thanks so much for sharing this at The Southern Special.
This is so cool! i love how it turned out! Thanks for linking up to DIY Inspired!
ReplyDeleteYou are welcome! Thank YOU, for having me :)
ReplyDeleteThanks, Stacey! :)
ReplyDeleteI'm glad you like it and stopped in! Thank you, Trish!
ReplyDeleteThank you, Angela :)
ReplyDeleteThis is so pretty! I love how you stained the wood, and especially the stenciling!
ReplyDeleteLove it! You did a great job. Thanks for linking up to Show Me Saturday! I hope to see you there this week.
ReplyDeleteYou'll be featured tonight at HandmadeintheHeartland.com! congrats!
ReplyDeleteThank you for the visit and the kind comment, Amy! Have a great weekend.
ReplyDeleteThank you, Ginger! I appreciate the invite :)
ReplyDeleteHave a great weekend.
Awesome! So excited and looking forward to the next link up! Thank you~
ReplyDeleteThank you for the visit and the invite! I look forward to stopping by. Have a great weekend!
ReplyDelete